Winter Home Checklist: How To Ready Your Home For Sub‑Freezing Temps
Getting your home ready for serious cold is one of the smartest money moves you can make as a new homeowner.
According to Guardian Service (citing the Insurance Information Institute), water damage and freezing made up nearly 28% of all home insurance property damage claims in 2022, with an average paid claim of about $13,954. In other words, a little prep before sub‑freezing temps can save you from a huge bill later.
This friendly checklist will walk you through what to do outside, inside, and right before a hard freeze so you can feel confident when the temperature drops.
1. Protect Outdoor Plumbing And Water Lines
Outdoor plumbing is usually the first place freezing temps cause trouble, because it is directly exposed to the cold. A burst hose bib or exterior pipe can send water into your walls or foundation in minutes.
Step 1: Disconnect and drain garden hoses
According to Advanced DRI Restoration, disconnecting and draining outdoor hoses is a standard expert‑recommended step to prevent frozen pipes.
Use this mini‑checklist:
- Unscrew all garden hoses from exterior faucets.
- Hold each hose upright and walk it from one end to the other so water drains out.
- Coil hoses loosely and store them in a shed, garage, or basement.
- If you have sprinkler attachments or nozzles, remove and drain those too.
Leaving a hose connected can trap water in the faucet and the pipe behind it, which makes it much more likely to freeze and burst.
Step 2: Shut off and drain exterior faucets
If your home has interior shut‑off valves for outside spigots, use them whenever temps will fall below freezing.
- Find the shut‑off valves inside your home. They are often:
- In the basement or crawl space
- Near where the main water line enters the house
- Labeled as “hose bib” or “exterior faucet”
- Turn the shut‑off valve clockwise to close it.
- Go back outside and open each exterior faucet fully. Let water drain out.
- Leave the exterior faucet slightly open so any leftover water can expand without breaking the pipe.
If your home does not have interior shut‑offs, consider having a plumber add them when your budget allows. They are a great long‑term upgrade for cold‑climate homes.
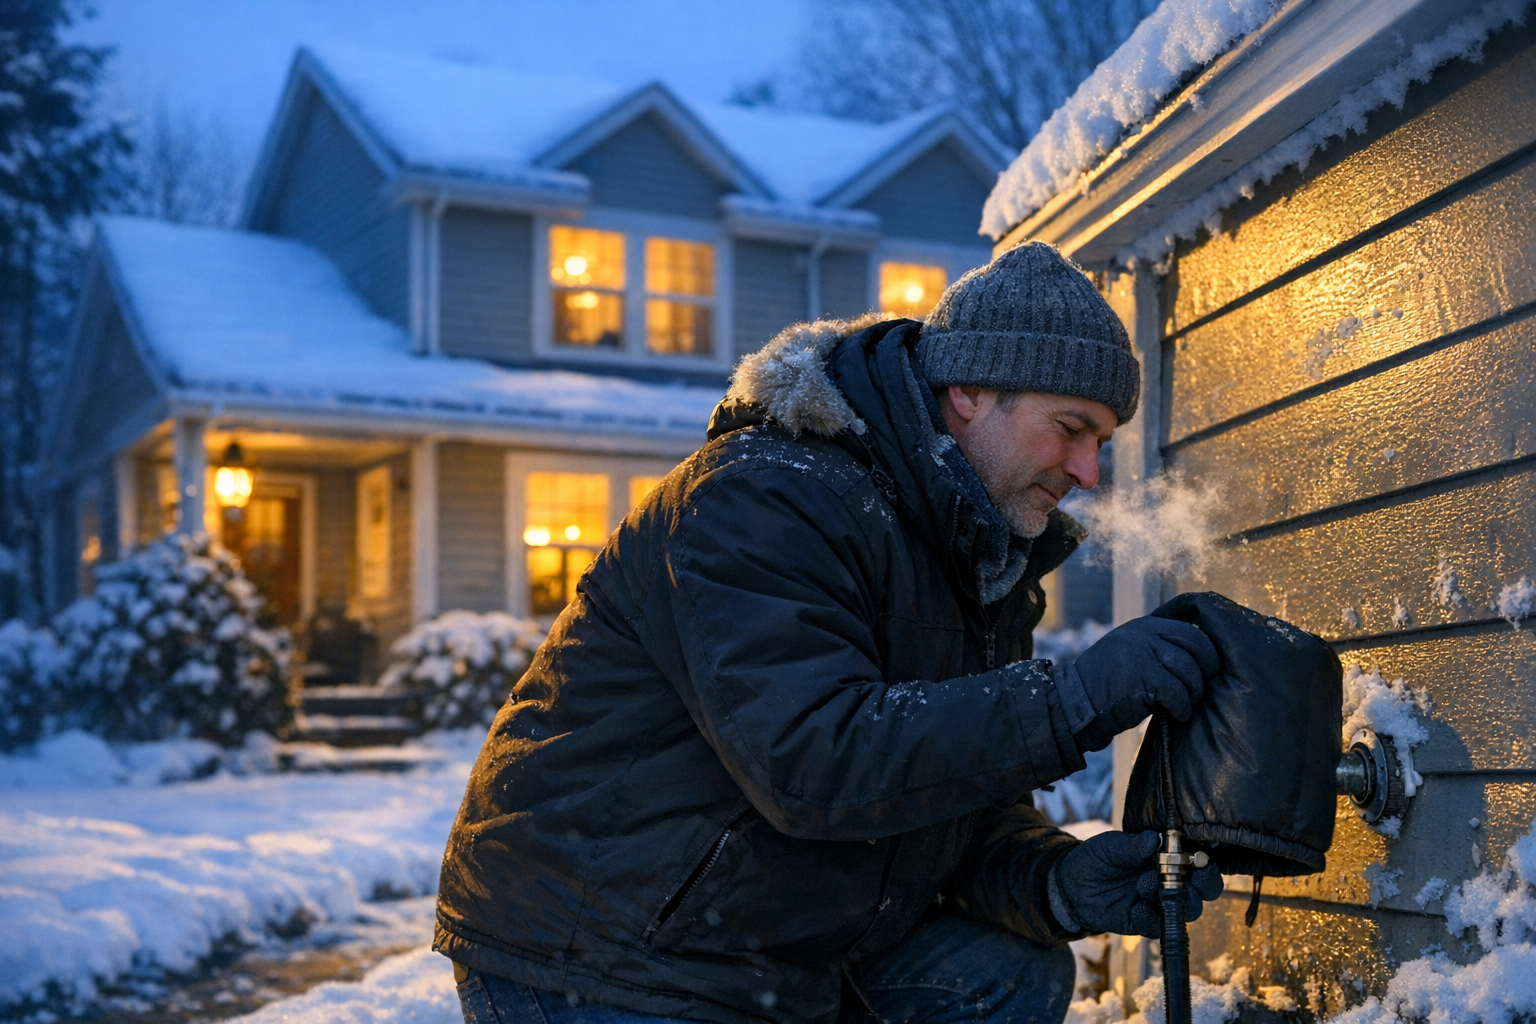
Step 3: Add insulated faucet covers
Plumbers and HVAC pros recommend insulating exterior hose bibs to reduce the risk of frozen pipes and water damage. According to Homes & Gardens, inexpensive foam faucet covers are a go‑to option.
To install them:
- Buy one cover per outdoor faucet.
- Place the cover over the faucet so it sits flush against the wall.
- Tighten the drawstring or strap so the cover stays snug.
It is a cheap, quick project that adds a lot of protection for just a few dollars per faucet.
2. Insulate Exposed Pipes In Cold Areas
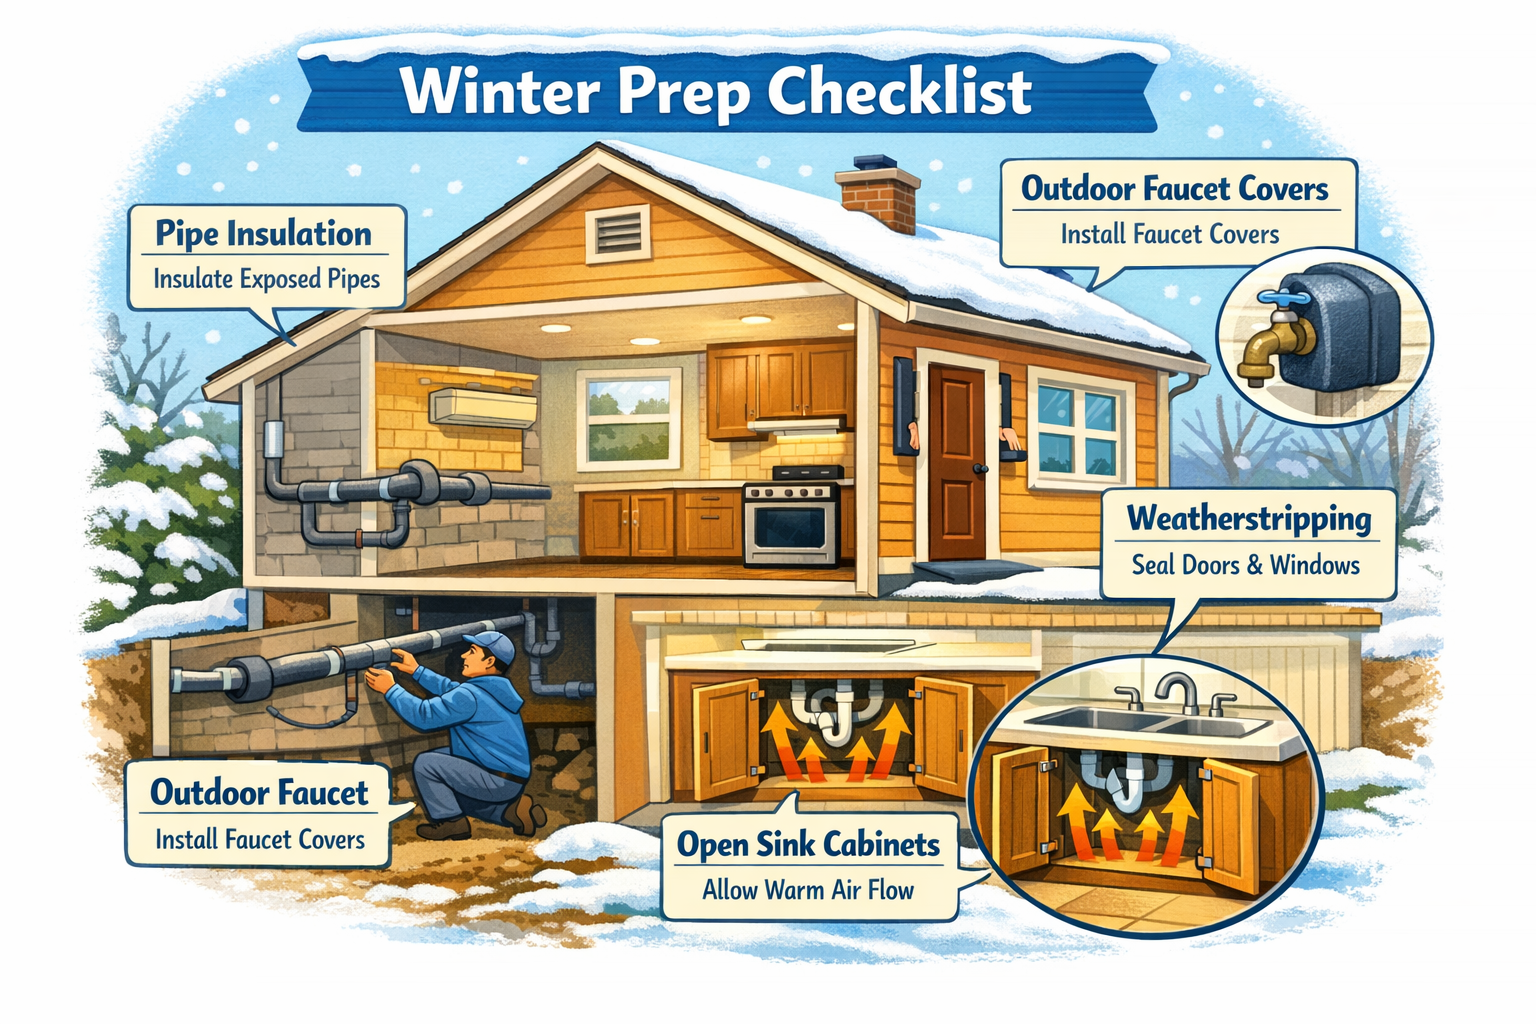
Pipes that run through unheated or drafty spaces are at the highest risk of freezing. That often includes:
- Crawl spaces
- Unfinished basements
- Garages
- Attics
- Pipes on or near exterior walls, especially under sinks
According to Angi, insulating exposed pipes in these areas with foam sleeves or heat tape significantly reduces the risk of frozen and burst pipes.
Step 1: Find vulnerable pipes
Walk through your home and make a quick map of where pipes are exposed.
Look for:
- Pipes you can see in unfinished spaces
- Pipes near drafty windows, vents, or doors
- Plumbing that runs along the ceiling of the basement right under the first floor
Tip: Take photos as you go. It will make it easier to remember what to buy and what you have already covered.
Step 2: Add foam pipe insulation
Foam pipe sleeves are usually sold in 6‑foot lengths and are sized by pipe diameter.
- Measure the diameter of your pipes or take a close‑up photo with a ruler for size reference.
- Buy foam pipe insulation that matches your pipe size.
- Open the slit along the foam and snap it over the pipe.
- Use tape or built‑in adhesive strips to hold it closed.
Focus first on:
- Any pipe that feels very cold to the touch in winter
- Pipes in unheated spaces
- Long stretches of exposed pipe that are near exterior walls
Step 3: Consider heat tape for high‑risk areas
In especially cold climates or for problem spots, electric heat tape may be recommended. This product warms the pipe slightly to prevent freezing.
If you are new to homeownership, consider hiring a plumber to:
- Select the right product for your pipe type
- Install it safely
- Show you where it is plugged in and how to turn it off and on
Improperly installed heat tape can be a fire hazard, so this is one task where professional help is worth it if you feel at all unsure.
3. Seal Air Leaks And Prep Your Heating System
Cold air sneaking into your home can chill pipes and make your furnace or boiler work harder than it needs to.
The U.S. Department of Energy advises sealing air leaks and maintaining heating systems as key fall and winter steps to reduce heat loss and improve comfort and safety in cold weather. You can read their full guidance on Energy Saver.
Step 1: Seal obvious air leaks
Do a quick draft hunt around your home:
- Windows and doors: Feel for cold air at the edges with your hand or a lit incense stick (the smoke will move if there is a draft).
- Outlets and switches on exterior walls: These can let in surprising amounts of cold air.
- Plumbing and cable penetrations: Look under sinks, behind toilets, and where pipes or wires enter from outside.
Then:
- Add weatherstripping around drafty doors.
- Use door sweeps at the bottom of exterior doors.
- Apply caulk around gaps in window frames and where pipes or cables enter the house.
- Use foam gaskets behind outlet and switch plates on exterior walls.
Sealing these leaks helps keep your whole home warmer, which also helps protect your plumbing.
Step 2: Service your heating system
A well‑maintained heating system is critical in sub‑freezing temps. Losing heat in a cold snap quickly increases your risk of frozen pipes.
Add these items to your checklist:
- Schedule annual HVAC service for your furnace or boiler, ideally in the fall.
- Replace or clean filters as recommended, often every 1 to 3 months.
- Check that supply and return vents are clear of furniture, rugs, and dust.
- If you have a programmable thermostat, set a reliable winter schedule so the temperature does not dip too low at night.
If you have not had your system inspected since moving in, booking that visit before deep winter is a smart first‑year move.
Step 3: Maintain a safe minimum indoor temperature
Many restoration and insurance experts recommend keeping your indoor temperature at 55°F or higher during cold weather, even if you are away. According to First Contact Restoration, this guideline shows up across multiple sources as a minimum safe set‑point.
For new homeowners, a simple rule of thumb:
- If temps outside will go below freezing, do not set your thermostat lower than 55°F.
- If a severe cold snap is forecast, consider keeping your home closer to 60–65°F, especially overnight.
This helps keep interior walls and the spaces inside cabinets warm enough to protect pipes.
4. Smart Steps Inside The Home Before A Hard Freeze
When a serious cold front is 24 to 48 hours away, there are a few extra steps you can take inside to protect your plumbing and your home.
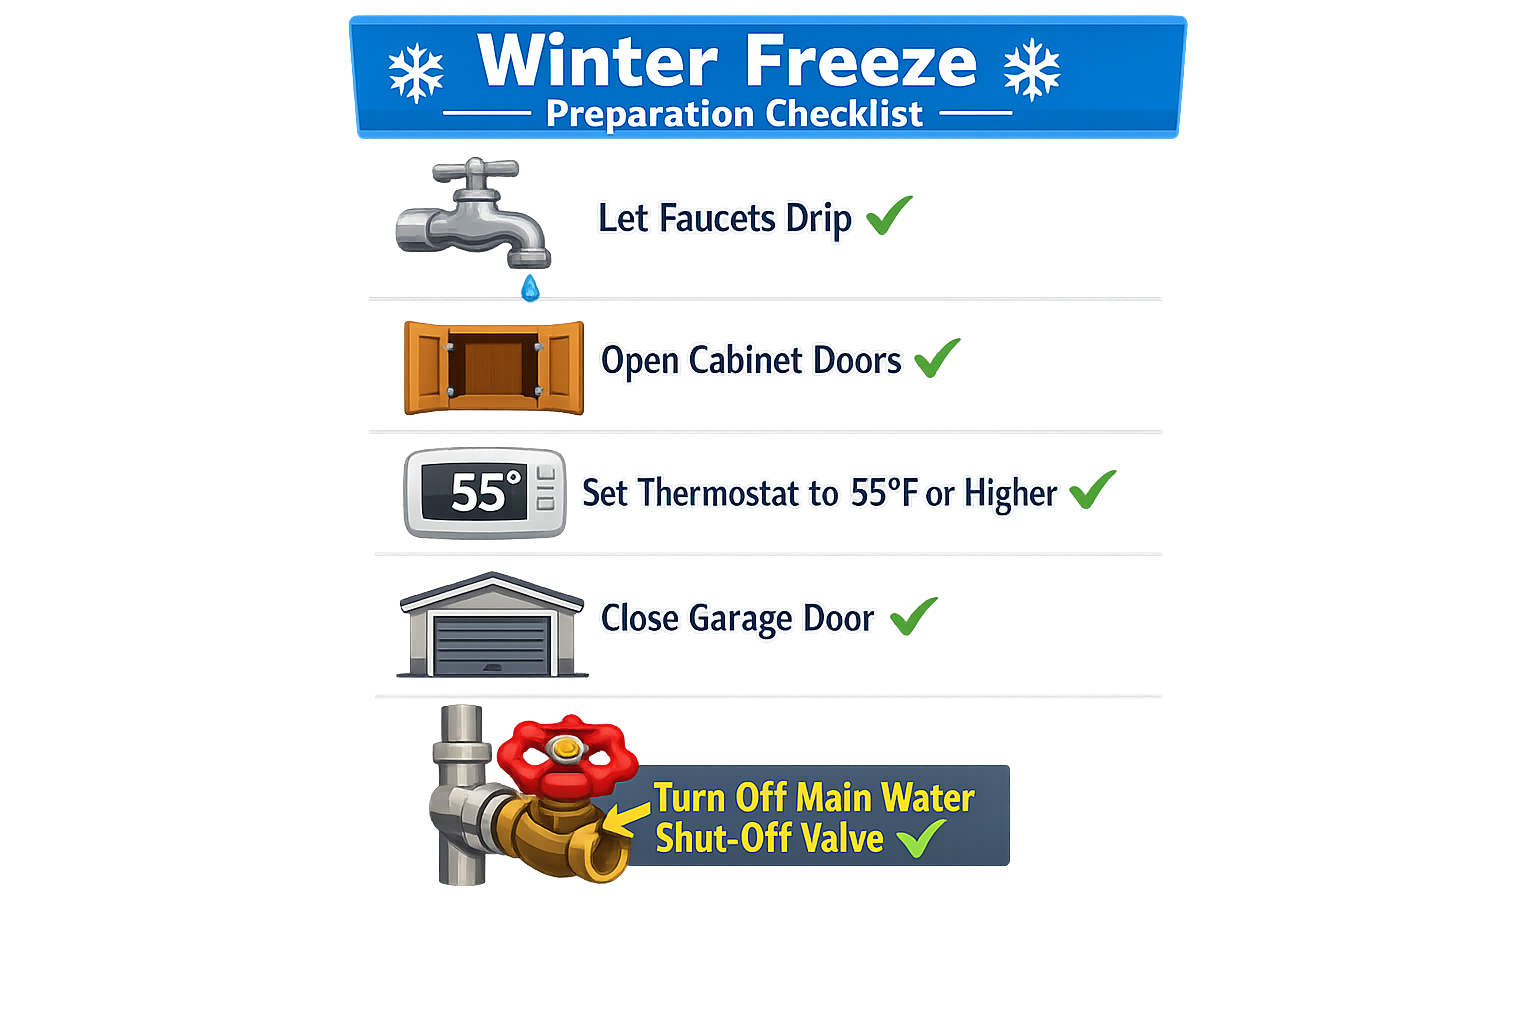
Step 1: Let faucets drip in key spots
Letting faucets drip slightly during hard freezes is a classic tip that still holds up. According to Angi, moving water is less likely to freeze and a slow drip helps relieve pressure inside pipes.
Where to let faucets drip:
- Sinks on exterior walls (kitchen and bathroom)
- Fixtures at the far end of your plumbing runs, such as upstairs bathrooms
- Any faucet that has frozen before, if you know your home’s history
How to do it:
- Turn the faucet handle just enough to get a very thin, steady stream or slow drip.
- Use both hot and cold taps if your home uses separate lines.
Yes, it uses a little extra water, but the cost is tiny compared to repairing a burst pipe and water damage.
Step 2: Open cabinet doors under sinks
Pipes inside cabinets on exterior walls can get much colder than the surrounding room. According to Advanced DRI Restoration, keeping cabinet doors open during extreme cold lets warm indoor air circulate around the plumbing.
Before a hard freeze:
- Open kitchen and bathroom cabinet doors under sinks on exterior walls.
- Move cleaning products and anything hazardous up and out of reach of kids and pets.
This tiny step can raise the temperature around your pipes just enough to prevent freezing.
Step 3: Close garage doors and reduce drafts
Garages often have water lines for hose bibs or utility sinks, and they leak heat quickly.
- Keep the garage door closed as much as possible in cold weather.
- If your garage has any exposed pipes, consider foam insulation or a small safe space heater on a thermostat, if recommended by a professional.
- Check the door between the garage and the house for good weatherstripping to keep cold air out of living spaces.
Step 4: Know where your main water shut‑off is
If a pipe does burst, the fastest way to limit damage is to shut off the main water supply.
If you have not already:
- Find your main shut‑off valve. Common locations:
- Where the water line enters through the foundation or slab
- Near the water meter
- In a mechanical room, basement, or crawl space
- Make sure the valve turns freely. If it is stuck, consider having a plumber replace it.
- Teach every adult in the home how to turn it off.
You hope you will never need it, but knowing how to use this valve is a key part of winter preparedness.
5. Quick Winter‑Ready Checklist For New Homeowners
Use this condensed checklist as you prep for sub‑freezing temps. You can copy and paste it into your notes app or print it and put it on the fridge.
Outside the home
- [ ] Disconnect, drain, and store all garden hoses
- [ ] Shut off interior valves to exterior faucets (if present)
- [ ] Open and drain exterior faucets
- [ ] Install foam faucet covers on all outdoor hose bibs
- [ ] Check outdoor spigots and exposed exterior pipes for leaks
Pipes and plumbing
- [ ] Walk through basement, crawl space, garage, and attic to find exposed pipes
- [ ] Add foam pipe insulation to exposed and cold‑feeling pipes
- [ ] Ask a plumber about heat tape for any high‑risk areas
Air sealing and heating
- [ ] Check around windows and doors for drafts; add weatherstripping or caulk as needed
- [ ] Seal gaps around plumbing and cable penetrations
- [ ] Install foam gaskets behind outlets and switches on exterior walls
- [ ] Schedule HVAC or boiler service if it has not been done this year
- [ ] Replace or clean furnace filters
- [ ] Set thermostat to at least 55°F (higher during severe cold)
Right before a hard freeze
- [ ] Let key faucets on exterior walls drip slightly (hot and cold)
- [ ] Open cabinet doors under sinks on exterior walls
- [ ] Close the garage door and minimize opening it
- [ ] Confirm everyone knows where the main water shut‑off valve is and how to use it
Keeping up with this list turns a stressful freeze warning into a simple routine.
Stay Warm, Stay Dry, And Take The Stress Out Of Winter
Sub‑freezing temps do not have to mean crossed fingers and late‑night pipe worries. With a bit of planning, you can:
- Protect your home from expensive water damage
- Make your home more comfortable and energy‑efficient
- Build confidence as a new homeowner each winter
If you have recently bought a home, this is a perfect time to walk through your space and learn where your shut‑offs, exposed pipes, and drafts are.
Use the HomeWalk app during your next home walkthrough to:
- Capture photos and notes of vulnerable pipes and outdoor faucets
- Save a personalized winter checklist tied to each room
- Track which winter prep tasks you have completed
A few hours of prep now can save you thousands later. Make this winter the one where your home is ready long before the first deep freeze hits.